Google BigQuery is a fully managed, cloud-based big data analytics web service for processing very large read-only data sets. BigQuery was designed for analyzing data on the order of billions of rows, using a SQL-like syntax.
For detailed info on how Stitch works with BigQuery, check out the Stitch Google BigQuery Destination Overview.
Prerequisites
For security purposes, we recommend setting up a new Google Cloud Platform (GCP) account and project for use with Stitch.
The user associated with the account must have:
- Full access to a GCP project. Stitch requires this permission to create datasets and load data into BigQuery.
- Admin permissions to a BigQuery instance that has billing info (a credit card) attached to it. Note that even if you’re using BigQuery’s free trial option, billing must still be enabled or Stitch will encounter issues with loading data into your data warehouse.
-
Storage Object Creation and Storage Object Viewer roles for Google Cloud Storage (GCS). Specifically, these include the following object permissions:
storage.objects.create,storage.objects.get, andstorage.objects.listobject
Stitch requires these permissions to create and use a GCS bucket to load replicated data into BigQuery.
Step 1: Create a GCP Account
This one’s easy. Simply sign up here and you’ll receive a $300 credit.
Step 2: Create a GCP Project & Enabling Billing
Next, create a new Project to house your BigQuery data warehouse by following these instructions.
Be sure to enable billing for the account, even if you’re using the free trial option. If billing isn’t enabled, Stitch will encounter issues when loading data into your data warehouse.
Step 3: Grant User Permissions
- After the Project has been created, open the Project in the GCP console. You can toggle between/select Projects by clicking the drop-down menu next to the Google Cloud Platform logo in the upper-left corner.
-
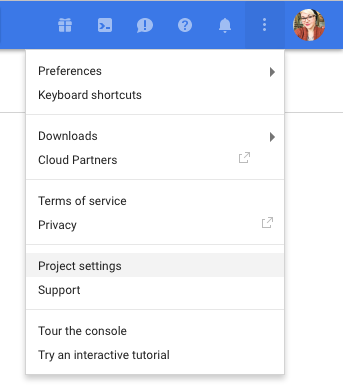
Navigate to the IAM & Admin page. This can be accessed by clicking Utilities & More (the three vertical dots next to your profile picture in the upper-right corner), then Project Settings:
- The permissions for the Project will display. In the list, locate the user you created.
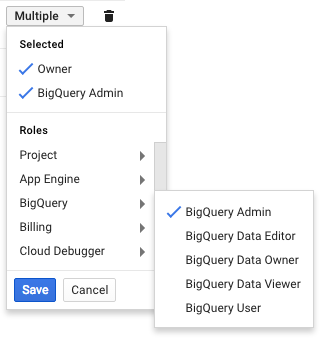
- Click Owner to open the Roles menu.
- Click BigQuery. An additional menu will display.
-
In the BigQuery Roles menu, select BigQuery Admin. The setup should look like this so far:
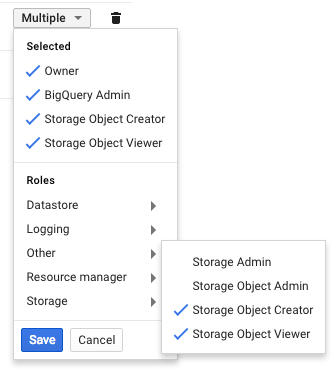
- In the main Roles menu, scroll down to Storage and click this option. An additional menu will display.
-
In the Storage Roles menu, select Storage Object Creator and Storage Object Viewer. The setup should look like this:
- Click Save.
Now that the GCP user is configured, you’re ready to hook up your BigQuery instance to Stitch.
Step 4: Authenticate with Google
The last step is to complete Google’s authorization process and grant Stitch access to the BigQuery project you created in Step 2.
- Sign into your Stitch account, if you haven’t already.
- Click the Destination tab, then the ** icon.
- Click Sign in with Google.
- If you aren’t already signed into your Google account, you’ll be prompted for your credentials. Sign into the Google account that you want to use to connect BigQuery to Stitch.
- After you sign in, you’ll see a list of the permissions requested by Stitch:
- Read/Write Access to Google Cloud Storage - Stitch requires Read/Write access to create and use a GCS bucket to load replicated data into BigQuery.
- Full Access to BigQuery - Stitch requires full access to be able to create datasets and load data into BigQuery.
- Read-Only Access to Projects - Stitch requires read-only access to projects to allow you to select a project to use during the BigQuery setup process.
- Basic Profile Information - Stitch uses your basic profile info to retrieve your user ID.
- Offline Access - To continuously load data, Stitch requires offline access. This is so the authorization token generated during setup process can be used for more than an hour after the initial auth.
- To grant access, click the Authorize button.
- After you sign into Google and grant Stitch access, you’ll be prompted to select a Project.
- Select the Project you created in step 2 from the drop-down menu.
- Click Finish Setup.
If the connection is successful, a Success! message will display at the top of the screen.
Troubleshooting Connection Errors
If you receive an error message, we recommend trying these troubleshooting steps for common destination connection problems before reaching out to support.
We’ve found that the majority of the time, these resources can resolve most issues.
Learning About Stitch & BigQuery
Now that your BigQuery data warehouse is up and running, we recommend learning about how Stitch will load your data into it.
- BigQuery Destination Overview: This overview will give you the high-level basics for working with your BigQuery data warehouse.
- Destination Data Loading Guide: This article covers many of the common scenarios Stitch will encounter when loading data into your BigQuery destination and the expected behavior for each scenario.
| Related | Troubleshooting |
Questions? Feedback?
Did this article help? If you have questions or feedback, please reach out to us.