Welcome to Stitch!
This guide will help you get your Stitch data pipeline up and running. In this guide, you’ll learn how to:
- Connect a data warehouse (we call them destinations)
- Connect an integration
- Configure & monitor replication
- Find additional resources and support
In this guide, we’ll walk you through setting up Stitch by demonstrating how to connect a MySQL database integration and replicate data from it to a Panoply destination.
If you have any questions not covered in this guide, check out the rest of our documentation or reach out to our support team.
Let’s get started.
Basics
A simple, powerful ETL service, Stitch connects to all your data sources – from databases like MySQL and MongoDB, to SaaS tools like Salesforce and Zendesk – and replicates that data to a data warehouse of your choosing.
With Stitch, developers can provision data to analysts and team members in minutes, not weeks. Stitch takes care of source management so your developers and analysts can get back to what they do best.
To use Stitch, you need:
- A Stitch account,
- A destination, and
- An integration
Stitch works best when viewed on a desktop or laptop computer. To ensure the app works properly, we also recommend temporarily pausing any ad blocking software and enabling pop-ups.
Destinations
A destination - or data warehouse - is a central repository of integrated data from disparate sources. When Stitch replicates your data, we’ll load it into the destination of your choosing.
There are a few important things you should know about destinations:
- A destination is required to use Stitch
- Stitch allows one destination per account
- Your free trial won’t officially start until data is replicated to your destination. Additionally, Stitch won’t replicate data until a destination is connected.
- Stitch itself isn’t a destination, and won’t provide one for you
If you’re new to data warehousing or you want to see how Stitch’s destination offerings compare to each other, check out our Choosing a Destination guide. This guide will help you choose the best Stitch destination for your data warehousing needs, from ensuring your data sources are compatible to staying within your budget.
You can find setup instructions for each of our destinations here.
Connecting a Destination
For the purpose of this guide, we’ll walk you through the simplest destination to setup: Panoply.io. Panoply is a cloud-hosted, fully managed data warehouse solution based on Amazon Redshift.
Some of Stitch’s other destinations require a bit more time and technical expertise to configure and connect, but with just a few clicks, you can spin up a free* Panoply destination of your own.
- To create a new Panoply destination, follow these instructions.
- To connect an existing Panoply destination, follow these instructions.
After you’ve set up a destination, you can start connecting your integrations.
Integrations
An integration is the Stitch word for data source. Using Stitch’s native integrations, you can replicate data from databases and SaaS applications like PostgreSQL, MongoDB, Salesforce, Zendesk, and more into your destination.
During your free trial, you’ll have access to all of the integrations we offer.
After your trial ends, some integrations - for example, MongoDB or Salesforce - will only be available if you select a paid plan.
Don’t see an integration you want? Don’t worry - you have options:
- Use the Import API integration to push arbitrary data into your data warehouse. You can use the IAPI to replicate data from CSV files, Google Sheets, and more.
- Use the Incoming Webhooks integration to pull event data from a webhook-based service. This generic integration can be used with dozens of services.
- Check out (and contribute to) Singer, our open-source, community-driven ETL platform.
- Use the Suggest Integration button on the Integrations page in the Stitch app. We’re always looking to add new integrations to our offerings.
You can find setup instructions in our database and SaaS integration docs.
Connecting a Database Integration
To provide you with a comprehensive look at how Stitch works, the rest of this guide will walk you through what the setup process would look like if a MySQL database integration were connected to Stitch.
Connecting a database to Stitch may be a little intimidating if you’re not a developer or tech-savvy. Not to worry - SaaS integrations are typically much easier to set up and you can always invite someone from your team to help you.
Replication
The next step is to define how you want Stitch to replicate data from your integration. Before we walk you through how to define replication, you should know a bit about Stitch’s replication process.
Stitch’s Replication Process
The Stitch replication process consists of three steps: extracting, preparing, and loading.
During the Extract part of the replication process, Stitch will use the replication settings to determine how often to replicate data, what tables and columns to replicate, and whether to replicate data incrementally or fully from the data source. We’ll go into more detail about these settings in the next section.
Once the data has been extracted, it moves into the Preparing phase of the replication process. During this phase, Stitch will perform light transformations such as de-nesting JSON (if applicable to your destination), column splitting for fields with multiple data types, and data typing for some integrations to ready the data for the data warehouse.
The last step is Loading. Stitch completes the replication process by writing the replicated data to your data warehouse in batches.
Defining Replication
Let’s define the replication settings for our MySQL database integration. The following settings dictate how and how often Stitch will replicate data from your integration. It’s important to be thoughtful when defining these settings, as they can impact what data is replicated from your integration and how many rows you replicate.
To extract data from your data source, you need to:
- Define the Replication Frequency
- Sync tables and columns
- Define Replication Methods
- Define Replication Keys
Replication Frequency
The Replication Frequency tells Stitch how often to attempt to replicate data from an integration. For example: if set to 30 minutes, Stitch will queue a replication job roughly every half hour.
- Click into the integration from the Stitch Dashboard page.
- Click the Settings tab.
- Scroll down to the Replication Frequency section.
-
Use the slider to select how often you want Stitch to attempt replication. We opted for every hour:
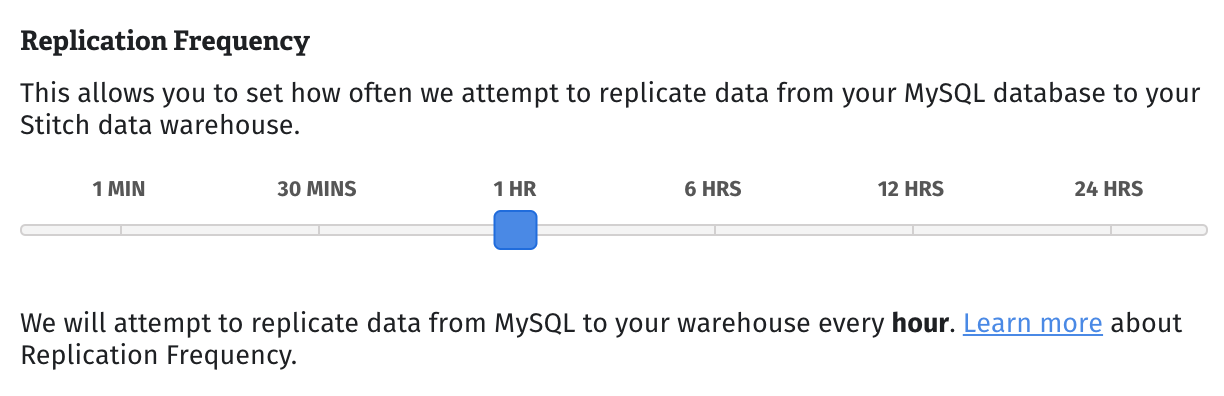
- Click Save Integration.
Keep in mind that the more often an integration is set to replicate, the higher your row count will be. This may lead to overages as Stitch charges by the number of rows replicated.
Syncing Data
Syncing tells Stitch which tables and columns to replicate data from. If syncing tables and columns is required to finish setting up an integration, Stitch will direct you to do so after the connection has been saved.
- Whitelisting is the Stitch term for the ability to sync specific tables and columns.
- All database integrations support some level of whitelisting…
- … However, most SaaS integrations currently don’t. For SaaS integrations that don’t support whitelisting, all available tables will be selected for replication. Check out the Schema section in any of the SaaS integration docs to learn more about the tables Stitch pulls in.
Syncing Tables & Columns
- In the Integration Details page, click the Tables to Replicate.
- Click the checkbox next to the object’s name. A green checkmark means the object is set to sync.
-
If there are child objects, they’ll automatically display and you’ll be prompted to select some.
For example: when the
stats_servicedatabase shown below is set to sync, the tables it contains immediately displayed and along with a prompt to sync some: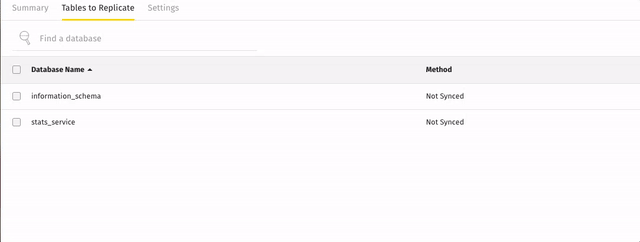
- Repeat this process for every table you want to replicate. Note that when you sync a table, by default all columns will also be set to sync.
After you set a table to sync, a new window will display. This is the Table Settings page and contains the remaining replication settings you need to define: the Replication Method and Replication Key. Note that Replication Methods and Keys can only be set for tables in database integrations.
Replication Methods
Replication Methods and Keys are the most important settings when it comes to ensuring Stitch replicates your data accurately. Incorrectly defining them can lead to data discrepancies, row overages, and increase the potential for latency.
Replication Methods tell Stitch how to replicate the data in syncing tables: Fully or Incrementally.
Incremental Replication
Incremental Replication means that only new or updated data will be replicated during a replication attempt. To reduce latency and keep your row count down, we recommend using Incremental Replication whenever possible.
To use Incremental Replication, the table must contain a datetime, timestamp, or integer column that is changed whenever data is updated. This column is called a Replication Key and is used to identify new and updated data for replication. We’ll go into more detail about Replication Keys in the next section.
Full Table Replication
Full Table Replication means that ALL rows in a table - including new, updated, and existing - will be replicated during every replication attempt.
Replication Methods can only be set for tables in database integrations. Replication Methods for SaaS integration tables are set by Stitch and can’t be changed. To learn more about how tables in SaaS integrations replicate, refer to the Schema section in the SaaS integration docs.
In our example MySQL integration, we want to replicate the batches table. New records are regularly created in this table, and existing records are never updated. To keep our row counts down while ensuring that we capture all new data in our batches table, we’ll want to replicate using Incremental Replication.
Next, we’ll show you how to choose the appropriate Replication Key for a table.
Replication Keys
If you want to use Incremental Replication, you’ll also need to select a Replication Key. Replication Keys are columns used to identify new and updated data for replication. These are typically integer, datetime, or timestamp columns.
When Stitch replicates your data, it will store the last recorded maximum value of the Replication Key column and compare it against the data source - not what’s in your data warehouse - to identify new/updated data. Any row with a Replication Key value greater than or equal to the stored value is where Stitch will begin the next replication attempt.
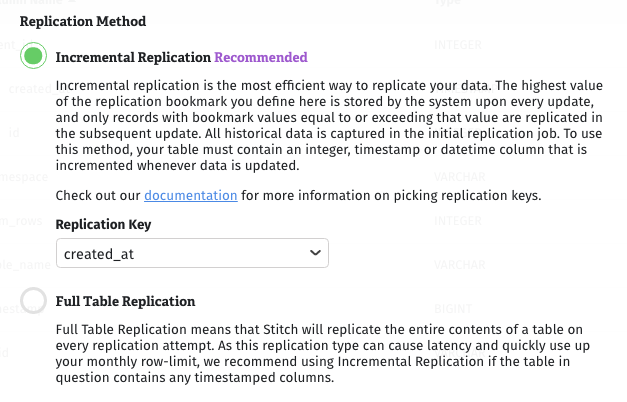
Defining Replication Methods & Keys
The created_at value in this table is populated with the present time each time a new record is created in this table. Since records are never updated, Stitch only needs to know when new data is created. Because of this, we can use created_at as the Replication Key for the batches table.
- Click the checkbox next to the object’s name. A green checkmark means the object is set to sync.
- When the Table Settings page displays, select the Incremental Replication option.
- In the drop-down menu, select the column to be used as the table’s Replication Key.
- Click Update Settings.
Here’s how we set the batches table to use Incremental Replication based on the Replication Key of created_at:
Monitoring Your Data
After you initially connect an integration, you might see a Pending status in the Last Sync Status field on the Stitch Dashboard page or on the Integration Details page:
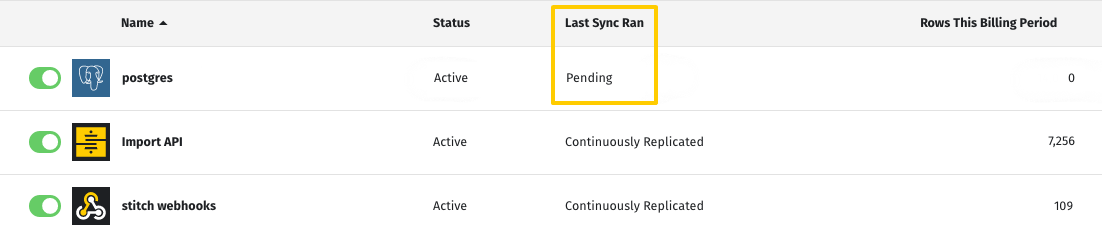
A Pending status indicates that Stitch is in the process of scheduling a replication job for the integration. For newly created integrations, this can take up to 30 minutes.
Initial/Historical Syncs
During the initial sync, Stitch will replicate the integration’s historical data. Historical syncs tend to be larger in volume compared to subsequent syncs, and as a result may take longer to process and load into your data warehouse. It’s normal to see a large spike in replicated rows during this time.
Ongoing Syncs
After the integration’s historical sync completes, you can expect the number of replicated rows for the integration to decrease and eventually level out. The time it takes for Stitch to extract, prep, and load data should also decrease.
Monitoring Replication Progress
Want to know where your data is in the replication process? The Replication Stats on the Integration Details page for every integration - which will display only after the initial sync has completed - can help you determine where your data is and check up on recently loaded data.
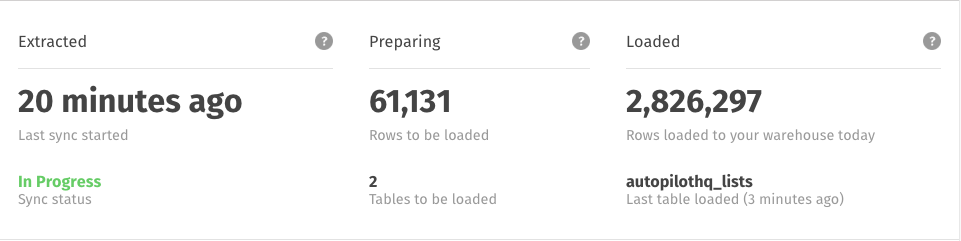
These stats are not real-time and will update every few minutes. Remember to refresh the page if you’re eager to watch your data move through Stitch.
To learn more about how info is displayed in these fields, check out the Monitoring Replication Progress guide.
What’s Next?
Congratulations! You set up a destination, connected an integration, and configured the replication settings. Stitch will soon begin replicating your data.
While you wait for the initial sync to complete, we recommend:
Learning About Stitch Billing
Our pricing is built on the number of replicated rows Stitch loads into your data warehouse. But what does “replicated row” mean? How can you keep your row count down and prevent overages? Check out the Understanding Your Usage guide to learn more about Stitch billing and how to reduce your usage.
Getting to Know Your Destination
Every destination handles data differently, which will impact how Stitch loads and stores the data it replicates from your integrations. Check out the Destination Data Loading guide for the specifics on your destination.
Getting to Know Your SaaS Integrations
Just like destinations, every SaaS integration structures its data differently. How Stitch replicates and loads SaaS data depends in part on how that data is created and structured. Our extensive SaaS integration docs cover what Stitch will replicate and how.
Selecting an Analysis Integration
If your end-goal is to analyze or interact with the data Stitch replicates, you’ll need an additional tool. Check out our list of Analysis Integration Partners to find the visualization, analysis, or data science tool that’s right for you.
Documentation & Support
If you have any questions not covered in this guide, check out the rest of our documentation or reach out to our support team.
Questions? Feedback?
Did this article help? If you have questions or feedback, please reach out to us.