In this tutorial, we’ll walk you through how to spin up a Google CloudSQL PostgreSQL instance and then connect it to Stitch as a destination, or data warehouse.
For more info on Google CloudSQL’s features and limitations, check out the official Google documentation.
Prerequisites
Before you begin, you’ll need to complete the following:
- Create or select a Cloud Platform project to house the instance in the Projects page.
- Enable billing for the project. Even if you’re using the Free option, billing must be enabled for the project or Stitch will encounter connection issues.
- Enable the CloudSQL Administration API for the Cloud Platform project.
Step 1: Create the CloudSQL Instance
- In the Google Cloud Platform Console, navigate to the CloudSQL Instances page.
- Select the project you created and click Continue.
- Click Create Instance.
- Click PostgreSQL.
- In the Instance ID field, enter an ID for the instance. Note that this ID is permanent and must begin with a letter.
- Enter a password for the
postgres(master) user. - If you want specific values for other fields, enter them. Otherwise, you can use the defaults. More info on the Instance Settings can be found here in Google’s documentation.
- When finished, click Create.
The instance may take a few minutes to finish initializing. After the process completes, click the instance to open it in the CloudSQL Instances page.
If you want to use SSL to connect Stitch to PostgreSQL, you’ll need to configure the instance to use SSL before continuing. You can find instructions for doing this in Google’s documentation.
Step 2: Create a Database in the CloudSQL Instance
This step is optional. If you want to use the instance’s default database (postgres), you can skip this step.
- In the CloudSQL Instances page, click the Databases tab.
- In the Databases tab, click New database.
- In the window that displays, enter a name for the database in the Name field. Note that Google clone a template database to create the new database - we’re going to use the template as-is, but you can change the settings afterwards if you like.
- Click Create.
Connect to your instance as a user with createdb permissions and run the following command, replacing [stitch_database] with whatever you want the database name to be:
create database [stitch_database];Responses are only returned if the command is not successful. If you don’t receive a response, then the command was successful and the database was created.
If you encounter errors - for example, createdb: command not found - then you’ll need to do some troubleshooting before you can move onto the next step. This Postgres article contains troubleshooting steps for some of the most common issues when creating databases.
Stitch doesn’t require any particular configuration for the database nor do you need to create any tables or schemas. Stitch will take care of that for you after the destination setup is complete and you’ve connected integrations.
Step 3: Configure Security & Access Settings
Next, you’ll configure the access settings for the instance. Google access control has two levels: at the instance and at the database.
-
At the instance-level, you’ll whitelist Stitch’s IP addresses. This will allow Stitch to connect to the instance.
-
At the database-level, you’ll create a database user for Stitch. This will allow Stitch to load your data into the database. We’ll cover how to create the user and assign permissions in Step 4.
To whitelist Stitch’s IP addresses:
- In the CloudSQL Instances page, locate and click the instance you created in Step 1.
- Click Access Control > Authorization.
- In the Authorized Networks section, click Add Network.
-
Enter one of Stitch’s IP addresses in the Network field:
-
52.23.137.21/32
-
52.204.223.208/32
-
52.204.228.32/32
-
52.204.230.227/32
-
- Click Done.
- Repeat steps 3-5 for each of Stitch’s IP addresses.
- Click Save to update the instance.
Step 4: Create a Stitch PostgreSQL Database User
Configuring the second part of the access control settings requires creating a database user for Stitch. There are two methods of creating a user in Google Cloud Platform: via the console (or UI) or using a psql client.
Before you choose a method, note that:
- Users created using the console have the permissions associated with the
cloudsqlsuperuserrole. This will include the required permissions outlined below. - If you want to grant Stitch’s user specific permissions, you need to use the psql client method. Google currently only allows the assignment of permissions via this method.
Required PostgreSQL Permissions
To successfully pipe your data to your PostgreSQL data warehouse, the Stitch user must:
- Be able to
CREATEschemas, tables, and views - Be able to
SELECTfrom systems tables - Be the owner of all integration schemas and tables. We occasionally need to run
COMMENTandALTER TABLEcommands to properly insert your data.
While you technically can manually create integration schemas in PostgreSQL and then grant Stitch access to those schemas, we don’t recommend it. We understand that security is a high priority and permissions should be carefully granted, but this approach will likely lead to headaches for you.
What do we mean? If you take this approach, you’ll need to first create the schema in your data warehouse and then grant the Stitch user the appropriate permissions to access it every single time a new integration is added in Stitch. If this isn’t done, Stitch won’t be able to load data into your data warehouse.
Additionally, if there are any differences between the name of the schema you create in your data warehouse and the schema name you enter in Stitch when setting up an integration, Stitch won’t be able to load data into your data warehouse.
Creating the Stitch Database User
Remember: users created using the Console method will have the permissions associated with the cloudsqlsuperuser role.
- In the CloudSQL Instances page, click the instance.
- Click Access Control > Users.
- Click Create User Account.
- In the window that displays, enter a name and password for the Stitch user.
- Click Create.
Remember: you must use the psql method outlined below to grant database users specific permissions.
If you haven’t already, connect to your PostgreSQL instance using your SQL client. Note that anything inside square brackets - [like this] - is something you need to define when running the commands yourself.
After connecting, run this command to create the user:
create user [stitch_username] with password '[password]';Next, you’ll assign the CREATE permissions to the user. For [database_name], enter the name of the database where all Stitch-replicated data should be loaded.
Note that this must be a pre-existing database.
grant create on database [database_name] to [stitch_username];If you restricted access to the information schema, you’ll also need to run this command to grant the Stitch user SELECT permissions:
grant select on all tables in schema information_schema to [stitch_username];Step 5: Connect Stitch to CloudSQL PostgreSQL
The last step is to locate the instance’s connection details and enter them into Stitch.
Locating the Connection Details in the Google Console
- In the CloudSQL Instances page, locate and click the instance you created in Step 1.
- When the instance’s Overview page displays, scroll down to the Properties section.
-
Locate the IPv4 address field, which is highlighted in the image below:
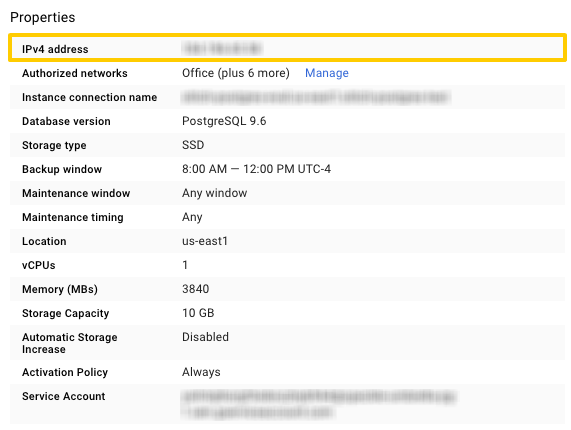
- Copy and paste the IPv4 address into a text file or leave this page open and open your Stitch account in another tab.
Entering the Connection Details into Stitch
To wrap things up, you need to enter the PostgreSQL database connection and user info into Stitch.
- Click the Destination tab.
- Click the PostgreSQL icon.
- Fill in the fields as follows:
- Host: Enter the host address (endpoint) used by the PostgreSQL instance. This is the address that is in the IPv4 address field in the Google Console.
- Port: Enter the port used by the PostgreSQL instance. This will be the PostgreSQL default, which is
5432. - Username: Enter the Stitch PostgreSQL user’s username.
- Password: Enter the password for the Stitch PostgreSQL user.
- Database: Enter the name of the PostgreSQL database that you created for Stitch.
-
If you’re using SSL to connect, check the Connect using SSL box. Otherwise, uncheck this option. Info on configuring SSL for CloudSQL instances can be found in Google’s documentation.
- When finished, click Update PostgreSQL Settings.
Stitch will perform a connection test to the PostgreSQL database; if successful, a Success! mesage will display at the top of the screen. Note that this test may take a few minutes to complete.
Troubleshooting Connection Errors
If you receive an error message, we recommend trying these troubleshooting steps for common destination connection problems before reaching out to support.
We’ve found that the majority of the time, these resources can resolve most issues.
Learning About Stitch & PostgreSQL
Now that your PostgreSQL data warehouse is up and running, we recommend learning about how Stitch will load your data into it.
- PostgreSQL Destination Overview: This overview will give you the high-level basics for working with your PostgreSQL data warehouse.
- Destination Data Loading Guide: This article covers many of the common scenarios Stitch will encounter when loading data into your PostgreSQL destination and the expected behavior for each scenario.
| Related | Troubleshooting |
Questions? Feedback?
Did this article help? If you have questions or feedback, please reach out to us.