In this tutorial, we’ll walk you through connecting your Heroku-Postgres destination to Stitch. Because Heroku is a cloud-based managed database service, spinning up an instance to connect to Stitch only takes a few minutes. No tech expertise required.
Prerequisites
The only requirement is a Heroku account.
You can create an account here if you don’t have one already. Heroku has a variety of plans to choose from, including a Free option. Check out Heroku’s Choosing the Right Heroku Postgres Plan article if you need some help selecting a plan.
Please contact Heroku if you have questions about their pricing, product features, or support.
Step 1: Create a Heroku Database
In this first step, you’ll create and provision a Heroku database.
- Sign into your Heroku account.
- Navigate to the Databases page by clicking the Options menu (the grid icon next to your avatar in the upper right corner) then Databases.
- Click the Create Database button in this screen.
- In the Plan prompt, select the plan you want to use.
- Select the Region for the database by clicking the Default Region drop-down menu.
- Click Add Database.
Heroku will begin the database provisioning process, which can take a few minutes. The status of your database will change to Available in the Database Dashboard page when things are complete:

Step 2: Locate the Heroku Database Connection Settings
Next, you’ll locate the database settings in Heroku. This info will be used in the last section to connect Stitch to your Heroku-Postgres destination.
- On the Heroku Database Dashboard page, click the database you just created.
-
The database settings and credentials will display. Everything you need is in the Connection Settings section of this page:
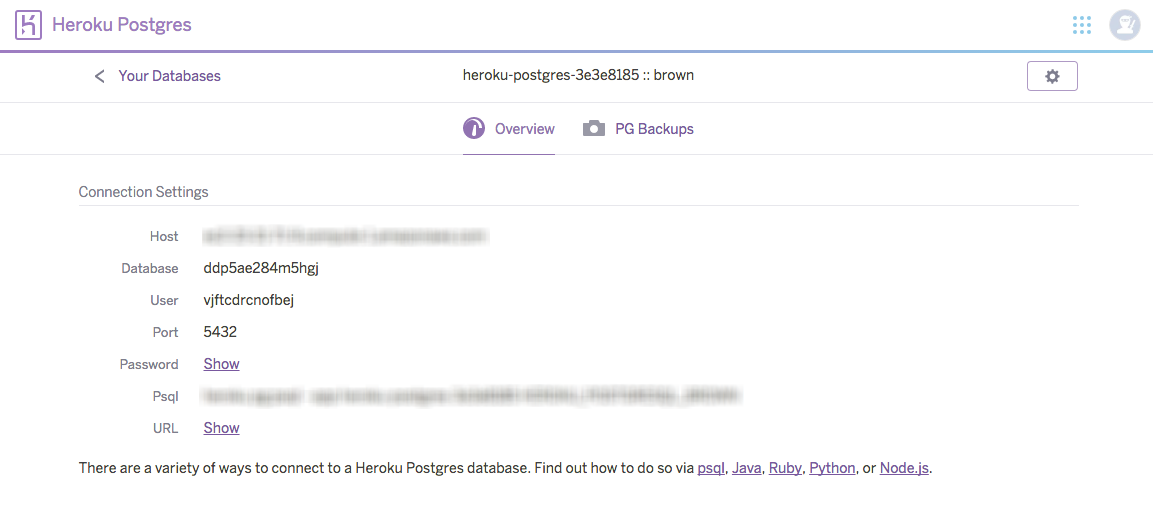
Leave this page open for now - you’ll need it to wrap things up.
To wrap things up, you need to enter the Heroku database connection and user info into Stitch.
- Click the Destination tab.
- Click the PostgreSQL icon.
- Fill in the fields as follows:
- Host: Enter the host address (endpoint) used by the Heroku instance.
- Port: Enter the port used by the Heroku instance.
- Username: Enter the Stitch Heroku user’s username.
- Password: Enter the password for the Stitch Heroku user.
- Database: Enter the name of the Heroku database that you created for Stitch.
-
Check the Connect using SSL box. Heroku requires SSL to connect - if you leave this unchecked, Stitch will be unable to connect to your Heroku database.
- When finished, click Update Settings.
Stitch will perform a connection test to the Heroku database; if successful, a Success! mesage will display at the top of the screen. Note that this test may take a few minutes to complete.
Troubleshooting Connection Errors
If you receive an error message, we recommend:
- Verifying that the Connect using SSL box in the Destination Settings page is checked. Heroku requires SSL to be enabled for the connection to be successful.
- Checking Heroku’s Status Page for possible service outages.
If the errors persist, please reach out to support.
Learning About Stitch & Heroku
Now that your Heroku data warehouse is up and running, we recommend learning about how Stitch will load your data into it.
- Heroku Destination Overview: This overview will give you the high-level basics for working with your Heroku data warehouse.
- Destination Data Loading Guide: This article covers many of the common scenarios Stitch will encounter when loading data into your Heroku destination and the expected behavior for each scenario.
| Related | Troubleshooting |
Questions? Feedback?
Did this article help? If you have questions or feedback, please reach out to us.