Amazon Redshift is fully managed, cloud-based data warehouse. As Redshift is built for online analytic processing and business intelligence applications, it excels at executing large-scale analytical queries. For this reason, it exhibts far better performance than traditional, row-based relational databases like MySQL and PostgreSQL. In this tutorial, we’ll walk you through how to spin up your own Redshift instance.
Prerequisites
The only requirement for using Redshift with Stitch is an Amazon Web Services (AWS) account.
To sign up for an AWS account, click here or enter this URL in your browser: http://aws.amazon.com/
Follow the instructions on the website to complete setting up your account.
Optional: Creating a VPC
This step is optional, but if you want to use your own VPC, you need to create it before continuing.
Additionally, you can also create your own Virtual Private Cloud (VPC) once your AWS account has been created. A VPC, or Virtual Private Cloud, is a scalable virtual network that resembles a traditional network used in a data center.
Before you dive in, however, note the following:
-
All AWS accounts created after December 3, 2014, include a default VPC in each AWS region. This means that you can use the default VPC to launch your Redshift cluster instead of spinning up your own.
Steps for creating a VPC are outside the scope of this tutorial, so our examples will use a default VPC.
-
Use Amazon’s Getting Started with VPC guide to create your own VPC. Note that the cluster you use for Stitch must reside in a publicly accessible subnet.
After you’ve signed up for an AWS account (and created a VPC, if you wanted one), you can move onto creating the cluster in the AWS console.
Step 1: Create Cluster Login Credentials
To create the Redshift cluster, you’ll create the master login credentials, select nodes, and define the cluster type.
To get started, sign into your AWS account and navigate to the Redshift Dashboard page. As of December 13, 2016, you can get there by clicking Services (top left corner), then clicking Redshift in the Databases section.
The Redshift Dashboard looks like this:

- On the Redshift Dashboard page, click the Lauch Cluster button.
- The Cluster Details page will display.
- Fill in the cluster details:
- Cluster Identifier: This is the unique key that defines a cluster.
- Database Name: This is the initial database for the cluster.
- Port: A port is an opening in a firewall that allows in and outbound traffic. By default, Redshift uses port 5439.
- Next, you’ll create the master login credentials. You can use these credentials to connect Stitch to your Redshift cluster if you like, or if you want to be more selective with the permissions, you can create an additional user for Stitch later on in the tutorial.
- Master User Name: This is the name of the master user for the cluster.
- Master User Password: This is the password associated with the cluster’s master user.
- Re-enter the master user’s password to confirm it.
- Click Continue.
Step 2: Select Nodes & Cluster Types
On the Node Configuration page, you’ll select the node type, define the cluster type, and decide how many nodes to use.
The type and number of node(s) you choose when creating your cluster is dependent on your needs and dataset. We do, however, recommend you set up a multi-node configuration to provide data redundancy. For some guidance on choosing the number of nodes, click here to read the ‘Determining the Number of Nodes’ section of the Amazon Redshift guide.
Here’s what we selected for our sample cluster:
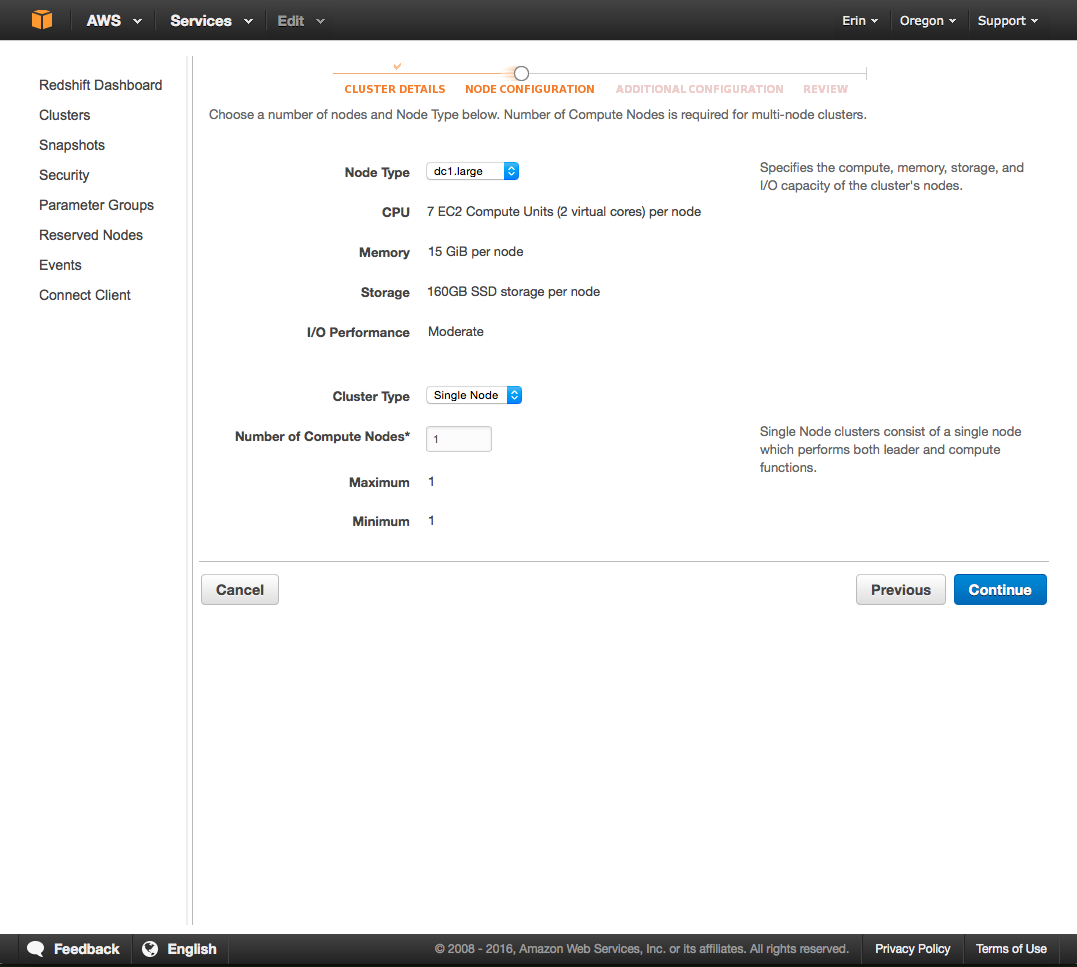
After you’ve selected a Node Type, Cluster Type, and enter the number of nodes, click Continue. This will open the Additional Configuration page.
Step 3: Configure & Launch the Cluster
Next, you’ll define the additional configuration settings for the Redshift cluster. In this step, you’ll define the encryption settings, define your networking options, associate a security group with the cluster, and launch.
For our purposes, we’re going to leave most of the settings as-is and focus on the Configure Networking Options and Security Groups sections.
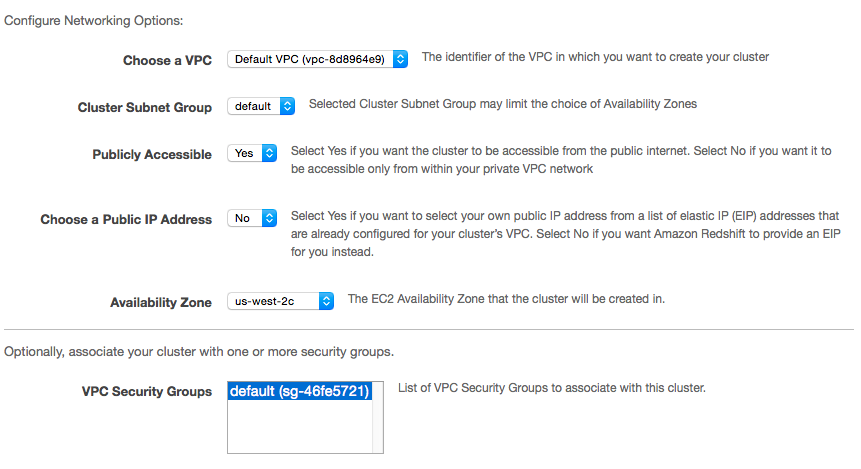
Configure Networking Options
In the Configure Networking Options section, define these fields:
- Choose a VPC: From the drop-down, select the VPC you want to launch the cluster in. This will also cause the other required fields to display.
-
Cluster Subnet Group: Set this to a public subnet in your account. Note a public subnet is required for the connection to be successful.
The default VPC included with all new AWS accounts also includes a default public subnet, which is what we’re using here.
- Publicly Accessible: Set this to Yes. This must be set to Yes for Stitch to access your Redshift instance.
Define a Security Group
The last step to configuring your cluster is to define the security group associated with the cluster.
Select the security group you want to associate with the cluster.
We’re using the default security group that’s included with all new AWS accounts, but you can choose any one you like. You’ll edit the access rules for the security group in the next section, which will allow the group to access the cluster.
Here’s what the configuration looks like for our sample cluster:
When finished, click the Continue button.
Review & Launch the Cluster
A review page containing all the details about your cluster (except for the master password) will display after you click Continue on the Additional Configuration page.
Additionally, the pricing info for the cluster will display at the bottom of the page.
After you’ve reviewed and confirmed the settings, click Launch to launch the cluster.
Cluster Creation
After you click Launch, AWS will begin spinning up your Redshift cluster. Note that this can take a few minutes - the status in the Cluster Dashboard page will change to ‘available’ when the process completes.
Step 4: Configure Security & Access Settings
When the cluster creation process is complete, you can move onto editing the cluster security group’s access rules.
To ensure that Stitch can access your Redshift instance and load data into your data warehouse, you’ll create a Security Group Connection Rule for the security group associated with the cluster. This will whitelist the IP addresses Stitch uses and ensure we can access your Redshift.
Access the Security Group
- On the Redshift Dashboard page, click the Clusters option in the left nav bar.
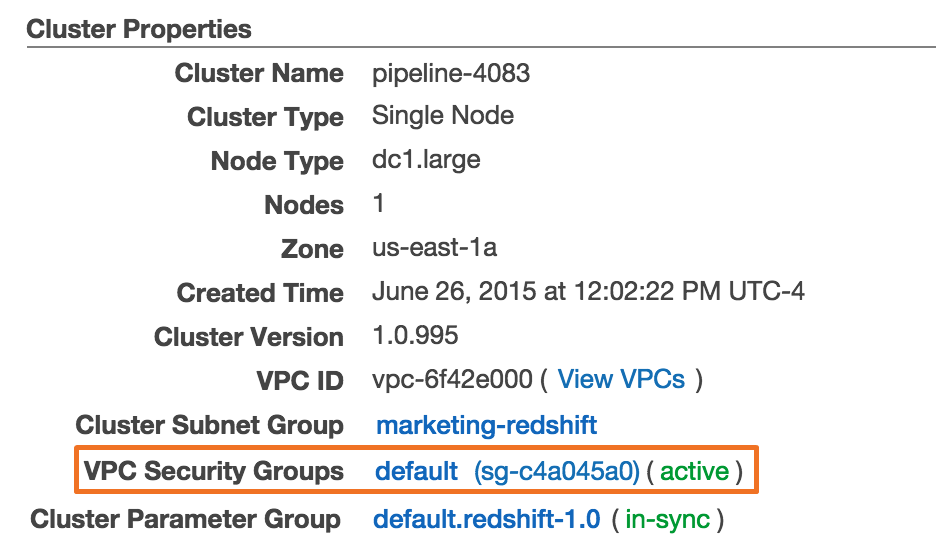
- In the Clusters page, locate and click on the cluster you just created. This will display the Cluster Details page.
- Locate the Cluster Properties section.
-
Click the name of the security group in the VPC Security Groups field:
- This will open the Security Groups page.
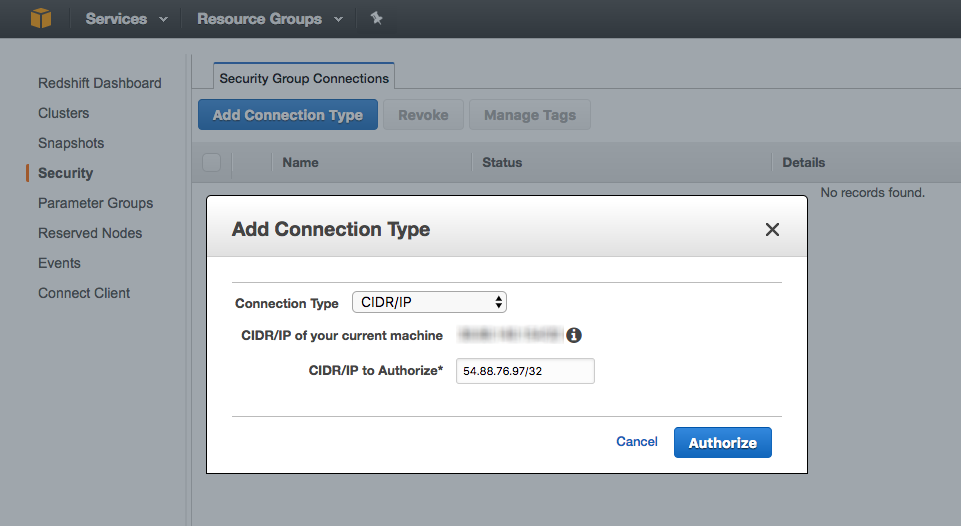
Creating a Security Group Connection Rule
- In the Security Group page, click the name of the Security Group associated with your instance.
- This will open the Security Group Connections tab.
- Click Add Connection Type.
- In the window that displays, select CIDR/IP from the drop-down menu.
-
In the CIDR/IP to Authorize field, copy and paste one of the following IP addresses:
-
52.23.137.21/32
-
52.204.223.208/32
-
52.204.228.32/32
-
52.204.230.227/32
Here’s an example of what the rule should look like:
-
- Click Authorize to create the rule.
- Repeat steps 3-6 until all of the Stitch IP addresses have been added.
Step 5: Create a Stitch Redshift User
As we mentioned when you created the instance, the credentials used to launch belong to the master user, or admin.
If you want to control the permission settings, you’ll need to create an additional database user for Stitch. An added benefit is that Stitch will be easily distinguishable in any logs or audits.
Requirements for Creating a Redshift User
You must be a superuser to create a Redshift user. If you’re not a superuser or you’re not sure what this means, please contact someone on your technical team before proceeding.
Required Redshift Permissions
To successfully pipe your data to your Redshift data warehouse, the Stitch user must:
- Be able to
CREATEschemas, tables, and views - Be able to
SELECTfrom systems tables - Be the owner of all integration schemas and tables. We occasionally need to run
COMMENTandALTER TABLEcommands to properly insert your data.
While you technically can manually create integration schemas in Redshift and then grant Stitch access to those schemas, we don’t recommend it. We understand that security is a high priority and permissions should be carefully granted, but this approach will likely lead to headaches for you.
What do we mean? If you take this approach, you’ll need to first create the schema in your data warehouse and then grant the Stitch user the appropriate permissions to access it every single time a new integration is added in Stitch. If this isn’t done, Stitch won’t be able to load data into your data warehouse.
Additionally, if there are any differences between the name of the schema you create in your data warehouse and the schema name you enter in Stitch when setting up an integration, Stitch won’t be able to load data into your data warehouse.
Create the Stitch User
Depending on the type of connection this is, the steps for creating a Redshift database user for Stitch will vary a bit:
- If Stitch hasn’t ever replicated data to your Redshift destination, follow the instructions in the NEW Connections tab.
- If Stitch has replicated data to your Redshift destination in the past, follow the instructions in the EXISTING Connections tab.
Note that the instructions below were tested using a Redshift instance with the default configuration.
If you haven’t already, connect to your Redshift instance using your SQL client. Note that anything inside square brackets - [like this] - is something you need to define when running the commands yourself.
After connecting, run this command to create the user:
create user [stitch_username] with password '[password]';Next, you’ll assign the CREATE permissions to the user. For [database_name], enter the name of the database where all Stitch-replicated data should be loaded. If you launched a cluster using this tutorial, it’s the name of the database when you launched the cluster in Step 2.
Note that this must be a pre-existing database.
grant create on database [database_name] to [stitch_username];If you restricted access to the information schema, you’ll also need to run this command to grant the Stitch user SELECT permissions:
grant select on all tables in schema information_schema to [stitch_username];Note that the instructions below were tested using a Redshift instance with the default configuration.
If you haven’t already, connect to your Redshift instance using your SQL client. Note that anything inside square brackets - [like this] - is something you need to define when running the commands yourself.
After connecting, run this command to create the user:
create user [stitch_username] with password '[password]';Next, you’ll assign the CREATE permissions to the user. For [database_name], enter the name of the database where all Stitch-replicated data should be loaded. If you launched a cluster using this tutorial, it’s the name of the database when you launched the cluster in Step 2.
Note that this must be a pre-existing database.
grant create on database [database_name] to [stitch_username];If you restricted access to the information schema, you’ll also need to run this command to grant the Stitch user SELECT permissions:
grant select on all tables in schema information_schema to [stitch_username];Transferring Integration Schema & Table Ownership
When an integration is initially connected to Stitch, a schema specific to that connection is created in your data warehouse. Ownership to those schemas and all the tables contained within them must be granted to the Stitch user for data replication to be successful.
First, you need to list all tables and their owners. Query the catalogue tables using this statement:
select * from [stitch_username] pg_tables;Take note of any integration tables that aren’t owned by the Stitch user - those are the tables you’ll need to update.
Now you’ll transfer ownership of the Stitch integration schemas:
alter schema [schema_name] owner to [stitch_username];Next, transfer ownership of all the tables in the integration schema to the Stitch user. You can do this table-by-table or run a script that will detect every table in an integration schema and re-assign ownership to Stitch.
To transfer ownership table-by-table, run this command:
alter table [table_name] owner to [stitch_username];Or, run this script from the command line to do it automatically:
for table in `psql -qAt --host [your.redshift.amazonaws.com] --port [port] --user [admin_user] -c "select tablename from pg_tables where schemaname = '[schema_name]';" [database_name]` ;
do psql -qAt --host [your.redshift.amazonaws.com] --port [port] --user [admin_user] -c "alter table \"[schema_name]\".\"$table\" owner to [stitch_username];" [database_name] ; done
Repeat the steps in this section for every Stitch integration schema in your data warehouse.
Step 6: Connect Stitch
To complete the setup, you need to locate your Redshift connection details and enter them into the Destination Settings page in Stitch.
Locate the Redshift Connection Details
- On the Redshift Dashboard page in the AWS Console, click the Clusters option in the left nav bar.
-
In the Clusters page, locate and click on the cluster you created. This will display the Cluster Details page.
- Locate the following fields:
- Endpoint
- Database (DB) Name: This is the name of the database you want to connect to Stitch. This must be a pre-existing database - Stitch won’t create one for you. It could be:
- The name of the database you used to launch the instance.
- The name of another database within Redshift.
- Username: You’ll only need this if you’re using the master user’s credentials to connect to Stitch.
- Port: This is the port used by the database.
Enter Redshift’s Connection Details into Stitch
To wrap things up, you need to enter the Redshift database connection and user info into Stitch.
- Click the Destination tab.
- Click the Redshift icon.
- Fill in the fields as follows:
-
Host: Paste the Endpoint address from the Redshift Details page in AWS into this field. Don’t include the port number, which is appended to the end of the endpoint - this will cause errors. For example: if you used the default port, you’d remove the following from the address: :
5439 - Port: Enter the port used by the Redshift instance.
- Username: Enter the Stitch Redshift user’s username.
- Password: Enter the password for the Stitch Redshift user.
- Database: Enter the name of the Redshift database that you created for Stitch.
-
- When finished, click Update Redshift Settings.
Stitch will perform a connection test to the Redshift database; if successful, a Success! mesage will display at the top of the screen. Note that this test may take a few minutes to complete.
Troubleshooting Connection Errors
If you receive an error message, we recommend trying these troubleshooting steps for common destination connection problems before reaching out to support.
We’ve found that the majority of the time, these resources can resolve most issues.
Learning About Stitch & Redshift
Now that your Redshift data warehouse is up and running, we recommend learning about how Stitch will load your data into it.
- Redshift Destination Overview: This overview will give you the high-level basics for working with your Redshift data warehouse.
- Destination Data Loading Guide: This article covers many of the common scenarios Stitch will encounter when loading data into your Redshift destination and the expected behavior for each scenario.
| Related | Troubleshooting |
Questions? Feedback?
Did this article help? If you have questions or feedback, please reach out to us.