| Release Status | Released | Availability | Free |
| Supported Versions | Depends on database type | SSL Connections | Unsupported |
| Whitelist Tables/Columns | Supported/Supported | View Replication | Depends on database type |
| Destination Incompatibilities | None | ||
Connecting RDS
If you want to connect a Postgres-RDS instance as a data warehouse, refer to the Connecting an RDS-Postgres Destination article.
Amazon Relational Database Services (RDS) is a managed database service that runs on database engines that you’re probably already familiar with, like MySQL and PostgreSQL.
In this article, we’ll walk you through connecting your Amazon RDS database to Stitch. You’ll need some tech expertise to complete the setup, so we recommend looping in a developer or a member of your tech team to help out if you haven’t done this before.
Connecting an RDS database is a eight-step process:
- Whitelist the Stitch IP addresses
- Retrieve the Stitch Public Key
* - Create a Stitch Linux user
* - Create a database user for Stitch
- Locate Your RDS Database Details
- Enter the connection info into Stitch
- Define the Replication Frequency
- Select tables & columns to sync
* These steps are only required if you’re using an SSH tunnel to connect the database to Stitch.
Whitelist Stitch’s IP Addresses
For Stitch to successfully connect with your RDS instance, you’ll need to add our IP addresses to the appropriate database security group via the AWS management console.
The IP addresses can be added to an existing group or you can create a new one. The important thing is that the group is authorized to access the instance you want to connect to Stitch.
To do this, an inbound security rule must be created for each of our IP addresses:
- In the management page for the security group, click the Inbound tab.
- Click the Edit button. This will display the Edit Inbound Rules window.
- In the Type field, select Custom TCP Rule.
- In the Port Range field, enter the port your database uses.
- In the CIDR, IP or Security Group field, enter the IP address. Below are all the IP addresses that must be added to the security group:
-
52.23.137.21/32
-
52.204.223.208/32
-
52.204.228.32/32
-
52.204.230.227/32
- To add another rule, click the Add Rule button.
- Repeat steps 3-6 until all the Stitch IP addresses have been added.
- Click the Save button.
Retrieve Your Public Key
If you aren’t using an SSH tunnel to connect, you can skip this step.
The Public Key is used to authorize the Stitch Linux user. If the key isn’t properly installed, Stitch will be unable to access your database.
To retrieve the key:
- On the Stitch Dashboard page, click the Add an Integration button.
- Click the RDS icon.
- When the credentials page displays, click the Encryption Type menu and select the SSH Tunnel option.
- The Public Key will display, along with the other SSH fields.
Create a Stitch Linux User
If you aren’t using an SSH tunnel to connect, you can skip this step.
sshd_config file associated with the server is not set to the default option, only certain users will have server access - this will prevent a successful connection to Stitch. In these cases, it’s necessary to run a command like AllowUsers to allow the Stitch user access to the server.Note that anything inside square brackets - [like this] - is something you need to define when running the commands yourself.
To create the new user, run the following commands as root on your Linux server:
adduser [stitch username] -p
mkdir /home/[stitch username]
mkdir /home/[stitch username]/.ssh
To ensure the user has access to the database, we need to import the Public Key into authorized_keys. Copy the entire key into the authorized_keys file as follows:
touch /home/[stitch username]/.ssh/authorized_keys
"< [PASTE KEY HERE] >" >> /home/[stitch username]/.ssh/authorized_keys
To finish creating the user, alter the permissions on the /home/[stitch username] directory to allow access via SSH:
chown -R [stitch username]:[stitch username] /home/[stitch username]
chmod -R 700 /home/[stitch username]/.ssh
In the next step, you’ll create a database user for Stitch.
Create a Stitch Database User
This is the part of the process where the steps will vary depending on the database you’re using. The idea is the same, though: you’ll create a user for Stitch which we’ll use to access your database.
Instructions for creating a database Stitch user can be found in the setup article for the database you’re connecting:
LocateYour RDS Database Details
The majority of this info can be found on the Database Details page in the AWS Console. You can access this page by:
- Navigating to the RDS Dashboard.
- Selecting the RDS instance you want to connect to Stitch.
- Clicking the Instance Actions menu and selecting See Details.
On this page, you’ll need to locate these fields:
- Endpoint
- Port
Below is a screen cap of this page with the required fields highlighted:
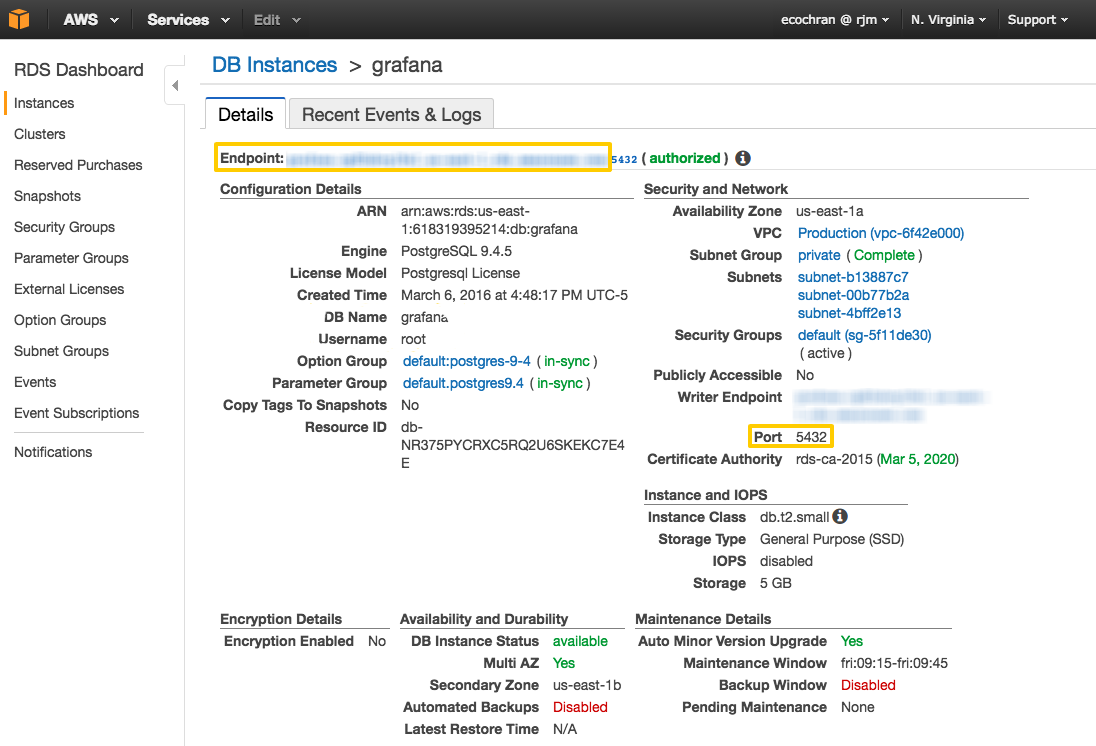
Leave this page open for now - you’ll need it to complete the setup in the next step.
Enter the Connection Info into Stitch
To wrap things up, you need to enter the database connection and user info into Stitch.
- On the Stitch Dashboard page, click the Add an Integration button.
- Click the icon (ex: MySQL) for the type of database you’re connecting.
-
Enter a name for the integration. This is the name that will display on the for the integration; it’ll also be used to create the schema in your data warehouse.
For example, the name “Stitch RDS” would create a schema called
stitch_rdsin the data warehouse. This schema is where all the tables for this integration will be stored. - Fill in the connection info for the database:
-
Host: Paste the address from the Endpoint field in the AWS Database Details integration. Don’t include the port number, which is appended to the end of the endpoint - this will cause errors.
For example, if you used the default port for Postgres, you’d remove the following from the address:
:5432 - Port: Enter the port used by the RDS instance.
- Username: Enter the Stitch database user’s username.
- Password: Enter the password for the Stitch database user.
- Database: Note that this is not required if you’re using a MySQL-based database. Enter the name of the default database Stitch will connect to. Don’t worry: we’ll find all the databases you gave the Stitch user access to, but we need an initial database to complete the connection.
-
Define the Replication Frequency
The Replication Frequency controls how often Stitch will attempt to replicate data from your RDS integration. By default the frequency is set to 30 minutes, but you can change it to better suit your needs.
Before setting the Replication Frequency, note that:
- The more often RDS is set to replicate, the higher the number of replicated rows.
-
The number of rows in the source may not equal the number of rows replicated by Stitch. Tables that use Full Table Replication will result in a higher number of replicated rows.
- If you’re using a data warehouses that doesn’t natively support nested structures, you’ll see a higher number of replicated rows due to the de-nesting Stitch performs.
To help prevent overages, we recommend setting the Replication Frequency to something less frequent - like 6 hours instead of 30 minutes. For tips on reducing your row count, check out the Reducing Your Row Count section of our Billing Guide.
After selecting a Replication Frequency, click Save Integration.
Select Tables & Columns to Sync
The last step is to select the tables and columns you want to sync. When you sync a table, you’ll also need to define its Replication Method and, if using Incremental Replication, its Replication Key.
You can sync tables and columns by:
- In the Integration Details page, click the Tables to Replicate tab.
- Locate a table you want to replicate.
- Click the checkbox next to the object’s name. A green checkmark means the object is set to sync.
- If there are child objects, they’ll automatically display and you’ll be prompted to select some.
- After you set a table to sync, the Table Settings page will display.
- In the Table Settings page, you’ll need to define the table’s Replication Method and, if using Incremental Replication, its Replication Key.
- Repeat this process for every table you want to replicate. Note that when you sync a table, by default all columns will also be set to sync.
RDS’s Intial Sync
After you finish setting up RDS, you might see its Sync Status show as Pending on either the Stitch Dashboard or in the Integration Details page.
For a new integration, a Pending status indicates that Stitch is in the process of scheduling the initial sync for the integration. This may take some time to complete.
Replicating Data from RDS
When you connect a database as an input, Stitch only needs read-only access to the databases, tables, and columns you want to sync. There are two processes Stitch runs during the Extraction phase of the replication process: a structure sync and a data sync.
Structure Sync
The first part of the replication process is called a structure sync. This process will detect any changes to the structure of your database. For example: a new column is added to one of the tables you’re syncing in Stitch.
The queries Stitch runs will depend on the type of RDS database (ex: MySQL) you connected to Stitch.
Stitch runs the following queries on MySQL-based databases to perform a structure sync:
SHOW TABLESSHOW KEYS FROM [table]SELECT * FROM INFORMATION_SCHEMA.TABLES
To perform a structure sync, Stitch runs queries on the databases and partitions tables in the sys schema.
Stitch runs the following queries on MySQL-based databases to perform a structure sync:
SHOW TABLESSHOW KEYS FROM [table]SELECT * FROM INFORMATION_SCHEMA.TABLES
To perform a structure sync, Stitch runs queries on the following tables in the pg_catalog schema:
pg_classpg_attributepg_indexpg_namespace
Stitch runs the following queries on MySQL-based databases to perform a structure sync:
SHOW TABLESSHOW KEYS FROM [table]SELECT * FROM INFORMATION_SCHEMA.TABLES
Data Sync
The second step in the Extraction phase is called a data sync. This is where Stitch actually pulls data out of your database for replication. The method Stitch uses is the same for all databases, but differs depending on the Replication Method that each table uses.
Full Table Replication
For tables using Full Table Replication, Stitch runs a single query (shown below) and reads out of the resulting cursor in batches.
select column_a, column_b <,...> from table_aIncremental Replication
For tables using Incremental Replication, Stitch runs a single query (shown below) and reads out of the associated cursor in batches.
select column_a, column_b <,...> from table_a
where replication_key_column >=’last_bookmark_value’
order by replication_key_column
Recommendations
While we make every effort to ensure the queries that Stitch runs don’t impart significant load on your databases, we still have some recommendations for guaranteeing database performance:
- Use a replica database instead of connecting directly. We recommend using read replicas in lieu of directly connecting production databases with high availability and performance requirements.
- Apply indexes to Replication Key columns. We restrict and order our replication queries by this column, so applying an index to the columns you’re using as Replication Keys can improve performance.
| Related | Troubleshooting |
Questions? Feedback?
Did this article help? If you have questions or feedback, please reach out to us.