| Release Status | Released | Availability | Premium |
| Status Page | NetSuite Status Page | Default Historical Sync | 1 year |
| Whitelist Tables/Columns | Supported/Unsupported | Default Replication Frequency | 30 minutes |
| Full Table Endpoints | 56 | Incremental Endpoints | 24 |
| Destination Incompatibilities | None | ||
Connecting NetSuite
Connecting your NetSuite data to Stitch is a six-step process:
- Create a Stitch NetSuite Admin user
- Retrieve the Stitch NetSuite user’s Role ID
- Add NetSuite as a Stitch data source
- Define the Historical Sync
- Define the Replication Frequency
- Select tables to sync
Prerequisites
You must have Administrator permissions in NetSuite. This is required to complete parts of the setup.
Creating a Stitch NetSuite Admin User
To connect NetSuite to Stitch, we recommend that you create a Stitch-specific Admin user for us. We suggest this approach for a few reasons:
- This will ensure that Stitch is easily distinguishable in any logs or audits.
- NetSuite’s API has some limitations that could make it difficult or impossible for Stitch to replicate data. For example: a single NetSuite user is only allowed to have one open API session at a time. If there’s another connection elsewhere, Stitch will run into problems replicating data.
After you’ve created the Admin user, move onto the next step.
Retrieving the Stitch NetSuite User’s Role ID
All Roles in NetSuite have a Name - for example, Accountant - and Role ID, or Internal ID number. Stitch requires this ID to successfully create a NetSuite integration.
Locating the Role ID
Role IDs can be found on the Manage Roles page in NetSuite. From your dashboard, click *Setup > Users/Roles > Manage Roles.
Locate the Role of the user in the Roles list. The ID is located in a column called Internal ID:
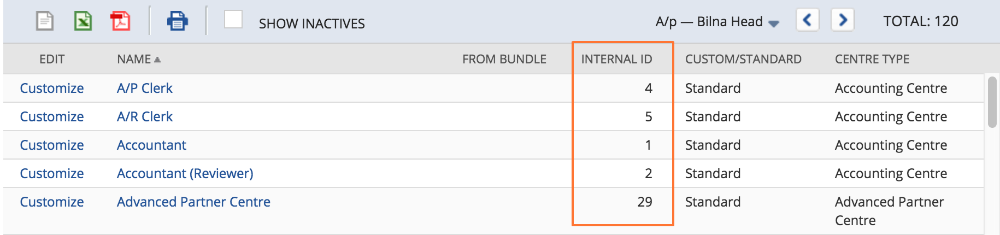
If you don’t see the Internal ID column in the list, you may need to add it:
- Click the Edit View button.
- Click the drop-down menu and select Internal ID.
- Click Add.
- Click Save.
After you add the column to the Roles list, locate the ID for the user and move onto the next step.
Add NetSuite as a Stitch Data Source
- On the Stitch Dashboard page, click the Add an Integration button.
-
Click the NetSuite icon.
-
Enter a name for the integration. This is the name that will display on the for the integration; it’ll also be used to create the schema in your data warehouse.
For example, the name “Stitch NetSuite” would create a schema called
stitch_netsuitein the data warehouse. This schema is where all the tables for this integration will be stored. - Enter the email address and password associated with the Stitch NetSuite user.
-
Enter the Role ID - the numerical ID, not the name of the Role - associated with the user entered above.
Note that if this field is left blank, Stitch will use NetSuite’s default role ID for Admin roles, which is 3. If you receive an error when trying to save the integration, enter a 3 in this field and try saving again.
- Select the Account Type - Production or Sandbox.
Defining the Historical Sync
The Sync Historical Data setting will define the starting date for your NetSuite integration. This means that data equal to or newer than this date will be replicated to your data warehouse.
Change this setting if you want to sync data beyond NetSuite’s default setting of 1 year. For a detailed look at historical syncs, check out the Syncing Historical SaaS Data article.
Define the Replication Frequency
The Replication Frequency controls how often Stitch will attempt to replicate data from your NetSuite integration. By default the frequency is set to 30 minutes, but you can change it to better suit your needs.
Before setting the Replication Frequency, note that:
- The more often NetSuite is set to replicate, the higher the number of replicated rows.
-
The number of rows in the source may not equal the number of rows replicated by Stitch. Tables that use Full Table Replication will result in a higher number of replicated rows.
- If you’re using a data warehouses that doesn’t natively support nested structures, you’ll see a higher number of replicated rows due to the de-nesting Stitch performs.
To help prevent overages, we recommend setting the Replication Frequency to something less frequent - like 6 hours instead of 30 minutes. For tips on reducing your row count, check out the Reducing Your Row Count section of our Billing Guide.
After selecting a Replication Frequency, click Save Integration.
Selecting Tables to Sync
To complete the setup, you’ll need to select tables you want to sync to your data warehouse.
Check out the Schema section to learn more about the available tables in NetSuite.
- In the Integration Details page, click the Tables to Replicate tab.
- Locate a table you want to replicate.
-
To sync a table, click the checkbox next to the table’s name. A green checkmark means the table is set to sync.
- Repeat this process for all the tables you want to replicate.
NetSuite’s Intial Sync
After you finish setting up NetSuite, you might see its Sync Status show as Pending on either the Stitch Dashboard or in the Integration Details page.
For a new integration, a Pending status indicates that Stitch is in the process of scheduling the initial sync for the integration. This may take some time to complete.
NetSuite Schema
For more detailed info on the attributes in each table, click the table names to check out NetSuite's documentation.
| Table Name | Replication Method | Primary Key | Notes |
|---|---|---|---|
| netsuite_account | Full Table | internalid |
|
| netsuite_accounting_period | Full Table | internalid |
|
| netsuite_app_definition | Full Table | internalid |
|
| netsuite_app_package | Full Table | internalid |
|
| netsuite_billing_schedule | Full Table | internalid |
|
| netsuite_bin | Full Table | internalid |
|
| netsuite_budget | Full Table | internalid |
|
| netsuite_calendar_event | Incremental | internalid |
|
| netsuite_campaign | Incremental | internalid |
|
| netsuite_charge | Full Table | internalid |
|
| netsuite_classification | Full Table | internalid |
|
| netsuite_contact | Incremental | internalid |
|
| netsuite_contact_category | Full Table | internalid |
|
| netsuite_contact_role | Full Table | internalid |
|
| netsuite_coupon_code | Full Table | internalid |
|
| netsuite_currency_rate | Full Table | internalid |
|
| netsuite_custom_list | Full Table | internalid |
|
| netsuite_customer | Incremental | internalid |
|
| netsuite_customer_category | Full Table | internalid |
|
| netsuite_customer_message | Full Table | internalid |
|
| netsuite_customer_status | Full Table | internalid |
|
| netsuite_custom_records | Full Table | internalid |
|
| netsuite_deleted | Incremental | internalid:_type |
See Deleted Records for info on using this table. |
| netsuite_department | Full Table | internalid |
|
| netsuite_employee | Incremental | internalid |
|
| netsuite_entity_group | Incremental | internalid |
|
| netsuite_expense_category | Full Table | internalid |
|
| netsuite_file | Full Table | internalid |
|
| netsuite_folder | Incremental | internalid |
|
| netsuite_gift_certificate | Full Table | internalid |
|
| netsuite_global_account_mapping | Full Table | internalid |
|
| netsuite_inventory_number | Full Table | internalid |
|
| netsuite_issue | Full Table | internalid |
|
| netsuite_item | Incremental | internalid |
|
| netsuite_item_account_mapping | Full Table | internalid |
|
| netsuite_item_demand_plan | Incremental | internalid |
|
| netsuite_item_revision | Full Table | internalid:_type |
|
| netsuite_item_supply_plan | Incremental | internalid |
|
| netsuite_job | Incremental | internalid |
|
| netsuite_job_status | Full Table | internalid |
|
| netsuite_job_type | Full Table | internalid |
|
| netsuite_location | Full Table | internalid |
|
| netsuite_manufacturing_cost_template | Full Table | internalid |
|
| netsuite_manufacturing_operation_task | Full Table | internalid |
|
| netsuite_manufacturing_routing | Full Table | internalid |
|
| netsuite_message | Full Table | internalid |
|
| netsuite_nexus | Full Table | internalid |
|
| netsuite_note | Full Table | internalid |
|
| netsuite_note_type | Full Table | internalid |
|
| netsuite_opportunity | Incremental | internalid |
|
| netsuite_originating_lead | Incremental | internalid:type |
|
| netsuite_other_name_category | Full Table | internalid |
|
| netsuite_partner | Incremental | internalid |
|
| netsuite_partner_category | Full Table | internalid |
|
| netsuite_payment_method | Full Table | internalid |
|
| netsuite_payroll_item | Full Table | internalid |
|
| netsuite_phone_call | Incremental | internalid |
|
| netsuite_price_level | Full Table | internalid |
|
| netsuite_pricing_group | Full Table | internalid |
|
| netsuite_project_task | Incremental | internalid |
|
| netsuite_promotion_code | Full Table | internalid |
|
| netsuite_resource_allocation | Full Table | internalid |
|
| netsuite_rev_rec_schedule | Full Table | internalid |
|
| netsuite_rev_rec_template | Full Table | internalid |
|
| netsuite_sales_role | Full Table | internalid |
|
| netsuite_site_category | Full Table | internalid |
|
| netsuite_solution | Incremental | internalid |
|
| netsuite_subsidiary | Full Table | internalid |
|
| netsuite_support_case | Incremental | internalid |
|
| netsuite_task | Incremental | internalid |
|
| netsuite_term | Full Table | internalid |
|
| netsuite_time_bill | Incremental | internalid |
|
| netsuite_time_entry | Incremental | internalid |
|
| netsuite_time_sheet | Full Table | internalid |
|
| netsuite_topic | Full Table | internalid |
|
| netsuite_transaction | Incremental | internalid:_type |
See Supported Transaction Types for a list of the transaction types Stitch will replicate. |
| netsuite_units_type | Full Table | internalid |
|
| netsuite_vendor | Incremental | internalid |
|
| netsuite_vendor_category | Full Table | internalid |
|
| netsuite_win_loss_reason | Full Table | internalid |
Deleted Records
Stitch’s NetSuite integration includes a table called netsuite_deleted; this table contains a row for every deleted record that supports deletes. Accounting for deleted records is especially important if you’re performing any sort of aggregate function - for example, totaling invoices or balancing your books.
For this reason, we strongly recommend you set this table to sync when selecting tables to replicate.
netsuite_deleted Table Schema
The attributes of the netsuite_deleted table include:
- type: This indicates the type of record. For example: invoice.
- name: This is the name of the record. For example: Invoice #INV197
- deletedDate: The date the record was deleted.
- customRecord: This indicates if the record was a custom record.
- internalId: This is the numerical ID of the record.
Custom records will look a little different than other records. In this case, you’ll see the following:
- type: This column will contain a numerical ID.
- name & internalid: The
internalidof the record will display in both columns. - customRecord: This column will contain a
truevalue.
For example: the first two records in this table are “normal” records, while the third is a custom record:
| type | internalId | name | customRecord | deletedDate |
|---|---|---|---|---|
| invoice | 124831 | Invoice #INV197 | false | 2016-08-02T09:33:07.000-07:00 |
| journalEntry | 111366 | Journal #JV13526 | false | 2016-08-04T12:01:22.000-07:00 |
| 19 | 128 | 128 | true | 2016-07-21T12:05:26.000-07:00 |
Accounting for Deleted Records
To account for deleted records, you can use a LEFT JOIN to tie deleted records back to the appropriate table. For example, the following SQL query would return all invoice records that exist in both the netsuite_transaction table and netsuite_deleted table:
SELECT *
FROM netsuite_transactions tran
LEFT JOIN netsuite_deleted del ON tran.internalId = del.internalId
AND tran.type = ‘invoice’
AND del.type = ‘invoice’
If you’re using a data warehouse that is case-insensitive (like Redshift), some queries may result in errors. If this occurs, try using LOWER to resolve the issue:
SELECT *
FROM netsuite_transactions tran
LEFT JOIN netsuite_deleted del
ON tran.internalId = del.internalId
AND LOWER(tran.type) = LOWER(del.type)
To filter out deleted records from other data, you can run a query like this one:
SELECT *
FROM netsuite_transactions tran
LEFT JOIN netsuite_deleted del ON tran.internalId = del.internalId
AND LOWER(tran.type) = LOWER(del.type)
WHERE del.deletedDate is null;
Supported Transaction Types
Because NetSuite includes so much under transactions, it may be a little difficult to know what to expect in the netsuite_transaction table. To give you a better idea, here’s a full list of what our integration will pull into this table:
| AssemblyBuild | CustomerPayment | ItemFulfillment | VendorBill |
| AssemblyUnBuild | CustomerRefund | ItemReceipt | VendorCredit |
| BinTransfer | Deposit | Journal | VendorPayment |
| BinWorksheet | DepositApplication | Opportunity | VendorReturnAuthorization |
| CashRefund | Estimate | PaycheckJournal | WorkOrder |
| CashSale | ExpenseReport | PurchaseOrder | WorkOrderClose |
| Check | InventoryAdjustment | Requisition | WorkOrderCompletion |
| CreditMemo | InventoryCostRevaluation | ReturnAuthorization | WorkOrderIssue |
| Custom | InventoryTransfer | SalesOrder | |
| CustomerDeposit | Invoice | TransferOrder |
| Related | Troubleshooting |
Questions? Feedback?
Did this article help? If you have questions or feedback, please reach out to us.